Lone Star Sampler Quilt
Lone Star Quilt

(I used a pattern from McCall's Quilting magazine, Jan/ Feb 2014 pages 27- 29.)
I started collecting fabrics to use, mostly fall colours, rusts, orange, browns, olive green, both tone on tones and pattern fabrics.
I began making this quilt in August, 2014 and completed it in late May, 2015.
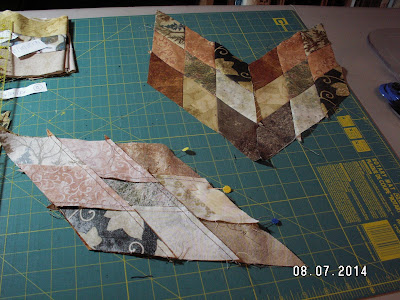
Making the various strip sets according to the dark and light variations was quite easy and I enjoyed matching the different fabrics together.


Each diamond needed 3 strip sets. Cutting the diamonds at a 45 degree angle was a little tricky. I had to recut the edge of the strip set quite frequently. The diamonds are 2 1/2 inches wide. Then 3 of them are sewn together to make the bigger diamond. That was the difficult part!

In order for them to line up properly, I had to draw a pencil line on the back of the diamonds, 1/4 inch in from the edge.

Then I put a pin through the back of the 3 piece diamond, exactly where each seam crossed a pencil line, put it face down on top of the second diamond and lined up the pins with the seam there.
The end of one diamond always stuck out about a 1/4 inch from the one below it, but once the seam was sewed, all the seams lined up quite well. I have to admit I did use my seam ripper quite a lot with these blocks. Any that didn’t line up well got taken apart and re-sewn. It did get frustrating sometimes, but the end results were good!

Eight of the big 9 piece diamonds had to be sewn together to make the lone star. Again, this was a bit tricky...
First I had to draw pencil lines 1/4 inch from the edges of the big diamonds on the back of all 4 sides. I had to start sewing them right sides together at the spot where these pencil lines crossed, (not at the ends,) sewing 2 big diamonds together each time, pressing the seams.

Eventually all 8 diamonds were together.


Eventually all 8 diamonds were together.
Next came the setting pieces to make the star blocks square…
 |
| Stars with 2 different setting pieces |
Sewing the setting pieces in between the points was tricky. I went online and found a tutorial for sewing y seams.
Here are 2 that I found useful:
https://www.jinnybeyer.com/quilting-with-jinny/tips-lessons/detail.cfm?instanceId=71DAA699-0AFE-8A90-85D38BA999BD18D8
http://www.craftsy.com/blog/2013/10/easy-y-seam-tutorial/
(Again I became good friends with my seam ripper. LOL!)
I started sewing at the corners, 1/4 inch in from the edge of the fabric and sewing out towards the star points. Most of the setting squares and triangles fit quite well and with some pressing they all looked good.

Sashing:
The McCall's pattern called for all the big blocks to be sewn together in rows of 3 directly to each other, but I wanted my quilt to be bigger so I decided to make sashing in between my blocks.
I did the math and figured out that I need a meter of fabric for the sashing between and around the 9 blocks.

The olive green fabric in my blocks would have looked great for that, but I didn’t have enough left and the fabric store where I had initially bought it didn’t have any more, so I had to think of something else.
I looked at the Hamel’s fabrics online site and found a nice cafe brown that I thought might work. They also had an olive green so I ordered a meter of that, and a meter of milk chocolate brown, just in case.

It took about 9 days to get the fabric sent and after laying out the 3 possible sashing choices next to the big Lone Star blocks, I decided that the cafe brown looked the best.
I cut the sashing 2 “ wide and sewed it on the blocks. I laid all 9 blocks out on the floor to decide on an arrangement and then numbered the blocks and labeled the rows.
Next I sewed sashing all around the 9 big blocks like an inner border.
Outer Border
I figured out how much fabric I would need for the outer border. I auditioned a couple of fabrics for this ‘job’. I figured out that I would need about 62 1/2 inches of fabric (LOF - 42” wide) to make the outer border. That way the finished quilt would measure 106” by 106” inches, a nice king sized quilt.
The fabric that I liked the best was called Nature’s Sketchbook (by Red Rooster) which I had bought in the USA a couple of years ago. It is also in the Lone Star blocks themselves.
I cut the fabric strips 6 1/4 inches wide LOF, and sewed 2 together to make them long enough for each side.

Batting:
I had a beautiful king size wool batting to use for this quilt. Have never used wool batting before but it is nice and light, and supposedly very warm.
Back Fabric: With a quilt this big, it requires a huge amount of back fabric. I decided that 8 meters would be more than enough.
I wanted a fabric design that would complement the quilt top itself. I found a beautiful rustic, fall coloured fabric on line at the Hamel’s fabric site called “Wish You Were Here” (by Holly Taylor for Moda.)
 |
| Back-Star block with sashing is 33 1/2". Fabric on either side is 42 X 33 1/2" |
I had quite a number of Lone Star ‘diamonds’ left after making the quilt top and I put 8 of them together to make a ‘scrappy star’ for the back to add some interest. :)
I added sashing around the star and then figured out how big to cut the fabric pieces to sew on either side of the star to fit across the back 10 inches longer than the quilt top (5 inches longer than each side.)
Then I figured out how big the fabric pieces had to be above and below the centre star piece. Again they had to jut out 5 inches longer than the quilt top. (42” X 114” each).
Our Heartland Quilt Guild is having their quilt show this weekend. I decided to get this big quilt professionally quilted on a long arm machine which I have never done before (I have always quilted
my own work.) It was very expensive, but it turned out beautifully!
my own work.) It was very expensive, but it turned out beautifully!


Labels: Lone Star blocks, McCall's Quilting magazine- Jan./Feb. 2014 issue, y seams
posted by CarolaD @ 12:03 PM
0 Comments
![]()


0 Comments:
Post a Comment
Subscribe to Post Comments [Atom]
<< Home