Sewing Curves OMG!/ Butterfly Quilt
Sewing Curves
WHAT was I thinking!!!
I fell in love with a cute butterfly quilt top pattern where the various colorful butterflies fit into each other (tessellate). Each block is made up of 9 pieces, all with curves (some with several). Each piece of the block has to be traced on the back of each fabric and then individually cut out.
"Okay, that isn't that hard", I thought to myself... so I went ahead and cut out 136 pieces to make 12 butterflies. (The original pattern called for 9 butterfly blocks, but it would have only finished as a 31 inch square baby quilt. So, true to form, I decided to "bite off a little more" so to speak and make 12 blocks to have a rectangular quilt instead.)
I laid out all the individual pieces on a fleece on the floor, switched a few pieces around to get more pleasing blocks and then I was ready to sew.
 |
| Tessilating block pieces |
OOPS! Once you try to match the adjacent pieces right sides together to sew them, the edges go every which direction! Now what??? I re-read the pattern directions again, but there was no indication at all that the sewing might be in the least bit tricky... In fact the directions were down right sparse!
 |
| Curved pieces to sew together |
 |
| Once you put the pieces right sides facing, it looks like an impossible task to sew them together |
Give up? Never! I'm too stubborn for that. I was determined to learn how to do this, one way or another!
Thank goodness for the internet! I went online in search of a tutorial on sewing curves together, hopefully with a helpful video, to give me advice or instruction on how to proceed.
One of the most helpful sites I found was this one:
http://shecanquilt.blogspot.ca/2011/12/sewing-curves-is-not-hard-seriously.html
Clipping the curves is also essential. Here's a good video to watch if you are a "Newbie" in that area:
http://wendigratz.blogspot.ca/2011/02/tips-and-tricks-for-sewing-curves.html
It isn't very hard to sew curved pieces together, once you know how, but it IS very slow and time-consuming. Tweezers are very helpful in this task.
 |
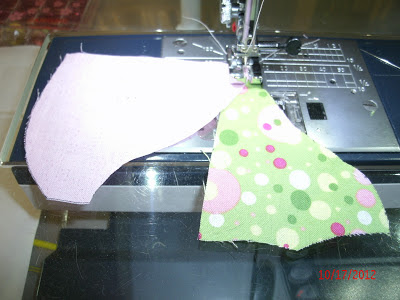
| Match the edges little by little |
Sew 2 or 3 stitches, then move the edge of the top piece to match the edge of the bottom piece, little by little, sewing 3 or 4 stitches slowly as you go. Try to keep your seams exactly 1/4 inch. Use your tweezers to help you grab the edges as you get close to the end.
 |
| Keep sewing, a few stitches at a time, stopping to pull the edges together as you go |
 |
| Almost done! Your tweezers will be your best tool at this point |
Once you are done sewing them together, clip all the curves carefully about every 1/4 inch along the seams, being careful not to cut into the stitches. Then press well.
 |
| It may have looked impossible, but you did it! :) |
I do encourage you to view the short video mentioned above (especially the first one) if you are new to sewing curves and be careful when you clip the edges! I ruined a few pieces by accidently cutting into them, which means extra time and work to remove the ruined piece, make a new one and then sew it back on...
All part of the joy of sewing! :)
Labels: sewing curves


0 Comments:
Post a Comment
Subscribe to Post Comments [Atom]
<< Home