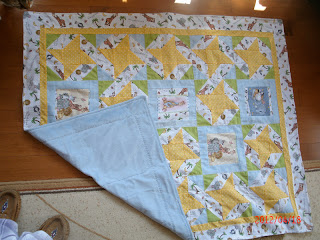
Things to Remember when sewing a Minkee back
When I 'enveloped' the quilt top to the Minkee back I discovered that sewing on a Minkee back is a little trickier than one might think. The secret is to PIN IT a LOT!
I had to take out two of the side seams with the first Minkee back quilt (Bazoople Patchwork), as it tends to stretch when you sew it and it was puckered when I went to sew the 4th side. After seam ripping 2 or the 3 sides that I had just sewn, I had to unpin the whole thing, smooth the quilt top and the Minkee again, re-pin everything and start over with sewing the side seams.
Don't make the mistake of trimming the excess Minkee off too soon! I had difficulty lining it up again... :(
The second Minkee back quilt I made a week later (Blazing Star Baby), I pinned twice as much, left a large edge of Minkee sticking out and then carefully sewed one seam edge at a time. I kept checking the Minkee back, re-pinning and re-smoothing as needed.
Then I sewed the second side, repeated the smoothing/ pinning process and by the time I did the 3rd and 4th side seams it was almost perfect. :)
This little baby quilt does not have batting in the middle. It is intended to be a light summer quilt.
The next one I make I think I will put light batting in between the pieced top and the minkee back. I wonder if the batting will help to hold the Minkee better?
After that I chose a quilt stitch from the many choices on my janome (Memory Craft 7700- I LOVE this machine!) and just sewed the seam lines between the blocks. After that I chose a different stitch and went around the outside of the yellow border. At the end, I sewed a scant 1/4 inch seam around the edge of the whole quilt.
Then I was done!
I always love that moment when you lift the quilt out of the machine and admire the finished product! :)
Happy Quilting!


0 Comments:
Post a Comment
Subscribe to Post Comments [Atom]
<< Home