Wednesday, October 17, 2012

Sewing Curves OMG!/ Butterfly Quilt

Sewing Curves


WHAT was I thinking!!!
I fell in love with a cute butterfly quilt top pattern where the various colorful butterflies fit into each other (tessellate). Each block is made up of 9 pieces, all with curves (some with several). Each piece of the block has to be traced on the back of each fabric and then individually cut out.


"Okay, that isn't that hard", I thought to myself... so I went ahead and cut out 136 pieces to make 12 butterflies. (The original pattern called for 9 butterfly blocks, but it would have only finished as a 31 inch square baby quilt. So, true to form, I decided to "bite off a little more" so to speak and make 12 blocks to have a rectangular quilt instead.)

I laid out all the individual pieces on a fleece on the floor, switched a few pieces around to get more pleasing blocks and then I was ready to sew.

Tessilating block pieces

OOPS! Once you try to match the adjacent pieces right sides together to sew them, the edges go every which direction!  Now what??? I re-read the pattern directions again, but there was no indication at all that the sewing might be in the least bit tricky... In fact the directions were down right sparse!


Curved pieces to sew together

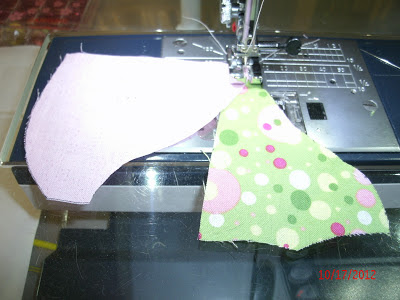
Once you put the pieces right sides facing, it looks like an impossible task to sew them together


Give up? Never! I'm too stubborn for that. I was determined to learn how to do this, one way or another!

Thank goodness for the internet! I went online in search of a tutorial on sewing curves together, hopefully with a helpful video, to give me advice or instruction on how to proceed.

One of the most helpful sites I found was this one:

http://shecanquilt.blogspot.ca/2011/12/sewing-curves-is-not-hard-seriously.html

Clipping the curves is also essential. Here's a good video to watch if you are a "Newbie" in that area:

http://wendigratz.blogspot.ca/2011/02/tips-and-tricks-for-sewing-curves.html

It isn't very hard to sew curved pieces together, once you know how, but it IS very slow and time-consuming.  Tweezers are very helpful in this task.


Decrease your stitch length before you start. Then put the 2 pieces rights sides together and pin where you want to start sewing.


Match the edges little by little

Sew 2 or 3 stitches, then move the edge of the top piece to match the edge of the bottom piece, little by little, sewing 3 or 4 stitches slowly as you go. Try to keep your seams exactly 1/4 inch.  Use your tweezers to help you grab the edges as you get close to the end.


Keep sewing, a few stitches at a time, stopping to pull the edges together as you go

Almost done! Your tweezers will be your best tool at this point


Once you are done sewing them together, clip all the curves carefully about every 1/4 inch along the seams, being careful not to cut into the stitches. Then press well.


It may have looked impossible, but you did it! :)


 If the edges haven't matched up well when you're done sewing, don't be afraid to use your seam ripper and take out part or even all of what you have sewn. There is a learning curve to this,  (No pun intended!  :)  and you will get better.


I do encourage you to view the short video mentioned above (especially the first one) if you are new to sewing curves and be careful when you clip the edges! I ruined a few pieces by accidently cutting into them, which means extra time and work to remove the ruined piece, make a new one and then sew it back on...

All part of the joy of sewing! :)


Labels:

Tuesday, October 2, 2012

Tying a Quilt


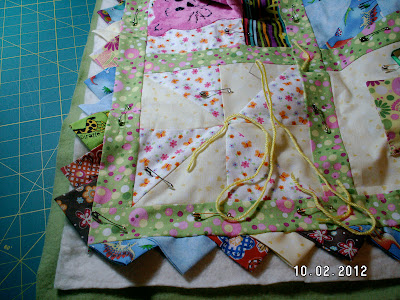
Pinned layers of Baby Play Quilt

Having recently finished the quilt top of the play quilt for my grand babies, it was time to wash the kitchen floor and get the quilt layers pinned together.
After that, with a bit of help from the kittens, Simba and Nalah, :) I taped the green fleece back fabric to the floor (right side down) with strips of masking tape, and then smoothed the inner batting on top of it. Next I placed the quilt top itself on the batting with right side up, smoothed it out and started the pinning process, inning all 3 layers together with basting pins.

With the fleece backing and the batting in the middle, the play quilt is quite thick, but that's what my daughter had requested so that  the quilt is soft on the hard floor when the babies play on it.  The next question was: how do I quilt all these thick layers together???

A quilter friend of mine had previously suggested that I could tie baby quilts instead of machine quilting them as I usually do. I have never tied a quilt before, but I am always up for the challenge of learning something new, so I decided to find out how to do it.

I looked in my copy of "The Quilting Bible" (Creative Publishing International) and it explained the process of machine tying a quilt quite well. I rather like that idea, especially the idea of machine appliqueing a small symbol (heart or star, or whatever) in the centre of a block to 'tie' the layers, but this quilt doesn't really lend itself to that. Most of the blocks are either pinwheels or the centre of the blocks are already occupied with an applique or a dinosaur.  (Will keep it in mind for future reference, though :)

I looked online for hand tying tutorials and found several good ones:

http://www.connectingthreads.com/tutorials/How_to_Tie_a_Quilt_Tutorial__D7.html

http://www.youtube.com/watch?v=YK20gl3Amvo

I decided that I would give hand tying a try. I found some bright yellow yarn to use as ties, but the most difficult part was threading it onto a needle.  Next I looked my little quilt over carefully to see where I should place the ties. There were no specific suggestions for how many ties or how close together they should be. One of the websites suggested that you look at the batting directions to see how close it should be quilted. (I think that 5 inches apart is a standard suggestion for many battings, but that looked too close on this quilt.)

The tutorial suggests using a long piece of yarn so that you don't have to thread the needle any more than necessary. It sounded easy enough, start at the top of the quilt, put the needle down through all layers, out the back and then back up through the layers about a 1/4 inch away from where you started, then repeating that right next to the first stitch...

Tie the ends in a square knot and then trim them to about 1 to 1 1/2 inches long


I ran into a snag right away!  My needle went in okay, but I could not get it pulled through. The eye end of the needle with the yarn on it got stuck. What could I use to pull the needle through all the way, I wondered???  I looked in the junk draw in the kitchen and found a thick elastic which I thought might help my to grip the needle more firmly to tug it through, but that didn't work. I backed the needle and yarn out... Now what?

Luckily I had read a tutorial for beginners first which suggests doing it in two steps:
1) Push the needle only through to the back, pulling most of the yarn through, (leaving about a 3 inch tail on top),

2) Then push the needle back through to the front.

3/4) Repeat step one and two close to the first stitches.

5) Last tie the yarn ends on top in a square knot, and cut the ends to about an inch in length (or whatever size you want. Some people like to tie the ends into a bow.)

Sounds easy, but I was still having a lot of difficulty gripping the needle to pull through all the thick layers and I ended up breaking three needles in the process!


I suddenly had a brainstorm, went to the kitchen drawer and took out my round flat rubber jar lid opener. Voila! It works great in gripping the needle in order to pull them through the fabric!

Now the hardest part was threading the yellow yarn onto the needle.

Suggestion: make sure your needles are sharp and choose one with an eye big enough to easily thread the yarn or ribbon or whatever you want to tie your quilt with. It will save you a lot of frustration!

It is quite a tiring job either way and your wrist and or fingers will get stiff pretty quickly so don't try to tie too much of your quilt at once.

I am about three quarters finished with the tying now and I am looking forward to having that part done soon.  (YAY!)

After that I need to trim the batting and back fleece, then hand stitch the fleece under the prairie points around the edge of the quilt and it will be all finished at last!

Happy Quilting!


'Peek-a-boo blocks'


Labels: