Saturday, February 28, 2015

New Toddler Quilt- Tessilating Butterflies Done!

Tessilating Butterfly Quilt

Tessilating Butterfly quilt is done plus matching pillowcase, both kitty approved!


I finished quilting and binding the butterfly quilt for my little grand daughter this week! Am so excited with the finished product! Yay!  I used free motion machine quilting to complete it.


Pillowcase made from leftover quilt fabric

Before starting the quilting, I measure the quilt again and realized that it was almost 5 inches shorter than the race cars quilt top that I was making for her twin brother. The butterfly quilt was already pinned together with the batting and backing, so what to do?
I checked the leftover fabric and there was next to nothing left…. I had used most of it up making the matching pillowcase.


But luckily the quilting goddesses were smiling that day and I found a small piece of the inner border fabric. I saw that it was just enough to cut it into 2 1/2 inch strips to add to the ends. (To create a double inner border at each end).
I carefully unpinned the outer borders at both ends, took them off with my faithful seam ripper and added the extra strips. Then I added the outer borders back onto both ends of the quilt, along with an extra piece at each corner. Talk about having just enough fabric!

It now measured 45 inches X 57inches!


Time to quilt it!
The light pink Minkee fleece on the back was much easier to work with than I remembered.
IT's always a good idea to look at your quilt top and think about what kind of quilting design would compliment it. Don't rush into it, (like I sometimes seem to do.)
At first I kept it simple: I ditch quilted right down the centre of the quilt between the rows of blocks. Then sewing from alternating sides, I ditch quilted all the way to both ends. The minkee fleece on the back was still sitting nice and straight. Yay! Then I quilted it the same way vertically.


Next I did a free motion butterfly pattern inside each block, on top of the tessillating butterfly, connecting each block in the row. Remember to take breaks and check the back of your work to make sure the tension remains good. Nothing more frustrating than working away diligently, and realizing afterwards that it looks really bad on the back. My bobbin has a habit of jumping the thread out of the groove, wreaking havoc with the tension. Then you have a half hour or more of "undo" work….

12 appliqued fussy cut butterflies

After that I ditch quilted all around the pink inner border.  At both ends of the quilt, the pink border was wider (see above) so I free motion quilted some of my easy signature butterflies there.
Now what to do for the outer colourful butterfly border, I thought. I decided to keep it simple and just do an easy free motion meander stitch.  I even love how the back turned out! :D

Last step: binding. Oh, oh, what could I use? I was pretty much out of fabric and since it mostly came from my stash, I couldn't just go out and get another 3/4 meter…  I checked a few other pink fabrics in my bin, but didn't want to introduce a new shade or pattern since the quilt top is so busy already.
Ah hah!  The leftovers from the pink Super Hero Cape is just the right shade of pink. Is there enough scrap left, I wondered?
http://carolasquilting.blogspot.ca/2015/02/super-hero-capes.html
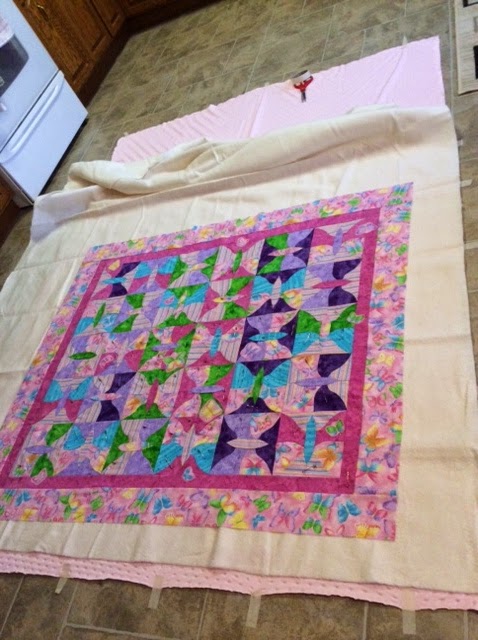

Laying out the quilt layers to pin

 Well I got lucky for the second time that week! I cut 2 1/4" inch strips, sewed them together and they were perfect for the binding.   With about 12 inches left at the end, I feel very fortunate. Maybe I should have gone out and bought a lottery ticket that day, too! :)

Happy Quilting!


Sunday, February 8, 2015

Super Hero Capes

Super Hero Capes


Our twin grandkids just had their 3 birthday. I was visiting recently and our grandson wanted me to take his feet out of his pyjamas, but leave the top part on... Ooookay, I wondered where that was going?  Is this related to potty training somehow I wondered???  Wrong! He was trying to create a Super Hero cape for himself. Quite ingenious, really.  Of course his twin sister followed suite and baby brother just stared (for now!)
Ever up for a challenge to try something new,  I figured whipping up a couple of simple Super Hero capes on my Janome would be pretty simple…
After a bit of research on line, I found the perfect site:   (www.threadridinghood.com)

http://www.threadridinghood.com/wordpress/made-by-me-monday-super-hero-cape-pattern-tutorial/

There was an easy cape template download there for a mere $2.99. There was even a link to a site  with Superman letters inside the Superman logo shape. Well, all the hard work is done for you, I thought. Yay!


 I bought some solid coloured broadcloth just as the site directions suggested. What luck! It was on sale for half price that week! Wow,  I thought, the quilting goddesses are definitely smiling down on me!
I bought 3 colours, dark blue, bright green and pink.


I quickly traced and cut out the dark blue and the pink for capes for the twins. Should I make inner lining or just  a nice seam around the outside?


"Well, you saved on the fabric so why not do as the directions say",  I thought to myself, (and stop "re-inventing the wheel" so to speak!)
I was so excited about how the capes would turn out I jumped to the logo directions. I had some red felt and yellow fabric for the logo backgrounds, plus the double sided webbing (Steam- a Seam 2). I started in on the H logo.


 In my excitement to get going I had skipped a step , not crucial, I could go back and do it, but I ended up having to cut the spaces around the H twice, once with just the red felt and again with it attached to the webbing, tedious extra work…

The letter C logo went a lot faster since it had less tiny spaces to cut out and I did the steps in the right order, tracing only once.


I was super careful about using a pressing cloth when pressing the logo to its yellow background with the webbing and then onto the back of the outer cape, 3 inches down from the neckline, centred equadistant from the sides. The H logo looked great on the dark blue!   But... the cape looked a bit too short!   I had made the 4T template size (our twins are 3 years old), but I realized it was 3 inches short of the 21 inches I had measured from the backs of the twins' necks to the backs of their knees... Dang!


Luckily I had not ironed on the C logo. What to do about the H logo which was stuck so fast to the short blue cape???
I got out the blue broadcloth, did some fancy re-folding and managed to trace another template, 21 inches long this time, (only just!) out of the leftovers! Yes, the quilt goddesses really were smiling on me. ( I pushed aside the thought that if they had been paying better attention to begin with, I would have done it correctly the first time!)


Next:
I took my trusty scissors and cut the H logo off the small blue cape, leaving a hole in the back, so it now became a mere scrap...
I re-folded the pink broadcloth, too and, yes, my luck was holding! I had enough to cut a new longer (21") pink cape., with very little to spare. :)

Green cape and lining for Little T's Super hero Cape
I pressed the C logo onto the cape with the iron, then proceeded to stitch the logo on just for good measure. That turned out to be a bit of a hassle! The thread kept breaking and I realized what the problem was: The needle was going through the logo, and through 2 layers of gummy webbing which was making a blob of thread stick to the needle. Yikes! What next, I thought!

Had to clean the needle well between stitching parts of the logo and had to re-thread the needle several times. (This is where the better quality Mettler silk finish thread stood out in comparison to the cheaper Gutermann thread, which kept breaking. )
I will have to re-think this webbing process when I make Little T's Logo…

Little T's green Super Hero cape without the logo

I sandwiched the lining with the cape (sewed them right sides together with a 6 inch "hole" left at the bottom. I clipped all the curves and turned the capes right side out! Nice!

 Next to last step was to sew a 1/4 inch seam all around each cape, catching the opening part at the cape bottoms, which I had pressed inward.
Last, I sewed a 1 inch piece of velcro onto the neck ends.
Wow! I am so pleased with how well they turned out! :D


One year old Little T. LOVE this happy, independent little guy! :)


Labels: