Saturday, January 28, 2017

Getting Caught Up- Echoes Placemats and Bows and Boughs Mats

Lots of quilting and sewing and (even knitting) has been going on in the last few months, but not much blogging. :)


Echoes Table Runners

I loved this pattern in the magazine (Quilter's World- May 2016) and decided to make one as a wedding gift last summer. Then I made 2 more, one to keep and one more as a gift. (The one on the right has only a thin inner layer of webbing material. It was meant for my cousin in Germany. There they don't usually use batting on their table toppers.


After finishing 3 table runners to take with me to Germany as hostess gifts (2 Lantern toppers and one Echo topper), I had lots of echo blocks left.  In November (2016) I worked on making myself a set of 6 placemats.
They were sandwiched together which eliminated the need for edge binding.
Seen below:


Some of the combinations work better than others, but the actual placemats look much nicer and than the photo.  I loved the uniqueness of this design. There was no use of rulers and cutting wheels for these mats. They were all made from tracing 2 different template pieces on different bali fabrics, then mixing and matching to get the circular pattern.

pinning curves to sew. Start with a pin at each and and one in the centre.

Then add more pins in between so that the edges on both pieces of fabric always meet.


The quilting was pretty simple. I started sewing with a simple walking foot at the circle ( produced by the 4 wedges) and I sewed concentric circles about a quarter inch apart smaller and smaller and smaller towards the centre. Then I free motion machine stitched the outer part in a simple meander style. each Echo place mat measures 14" X 16"  (inches).

I was happy with the outcome and was thrilled to start using them at the table.


Bows and Boughs Christmas Placemats


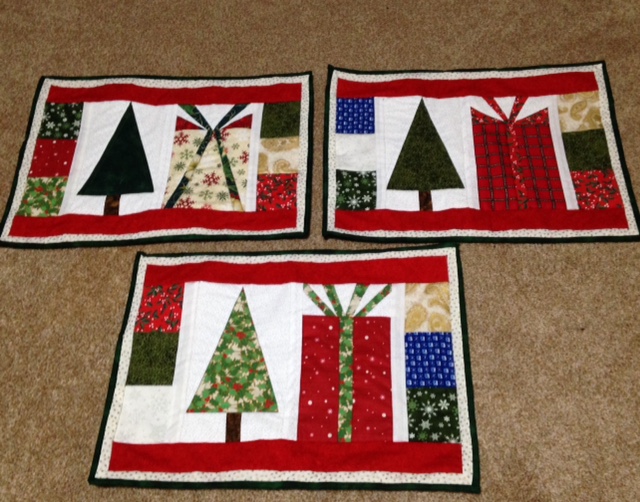
I was pretty "done" with tracing and sewing curves by then so I decided that I would work on some straight edges and finish up the 'Bows and Boughs" Christmas placemats that I had started last year (to match the table runner that I finished almost a year ago. Never too late to work on a UFO, right?

I realized that the Christmas placemat tops were a bit too long and narrow, so I chopped off a half inch from each side and added a red border on top and bottom (to add to the width) and a narrow white /gold star border around the 4 sides.   I quilted them mainly with ditch quilting except the spruce trees which I echo quilted towards the centre. (hard to see from the photos.)

The completed Bows and Boughs mats are 14 inches wide by 18 inches long.  I completed them on January first (in time to use for Ukrainian Christmas, LOL! )  :)


Sometimes you get lucky! That small 3 inch piece of dark green binding on the ruler is all that I have left of that fabric after putting the edge binding on all 6 placemats! :D


In between these 2 sets of mats, I worked on another UFO, my Judy Niemeyer paper pieced quilt top, Steppingstones pattern. What a HUGE amount of work that was! That's another story coming up soon. Happy quilting!


Georgie kitty, testing out the mittens that I knitted for my grandsons aged 3 and nearly 5


Labels: , ,

Wednesday, October 17, 2012

Sewing Curves OMG!/ Butterfly Quilt

Sewing Curves


WHAT was I thinking!!!
I fell in love with a cute butterfly quilt top pattern where the various colorful butterflies fit into each other (tessellate). Each block is made up of 9 pieces, all with curves (some with several). Each piece of the block has to be traced on the back of each fabric and then individually cut out.


"Okay, that isn't that hard", I thought to myself... so I went ahead and cut out 136 pieces to make 12 butterflies. (The original pattern called for 9 butterfly blocks, but it would have only finished as a 31 inch square baby quilt. So, true to form, I decided to "bite off a little more" so to speak and make 12 blocks to have a rectangular quilt instead.)

I laid out all the individual pieces on a fleece on the floor, switched a few pieces around to get more pleasing blocks and then I was ready to sew.

Tessilating block pieces

OOPS! Once you try to match the adjacent pieces right sides together to sew them, the edges go every which direction!  Now what??? I re-read the pattern directions again, but there was no indication at all that the sewing might be in the least bit tricky... In fact the directions were down right sparse!


Curved pieces to sew together

Once you put the pieces right sides facing, it looks like an impossible task to sew them together


Give up? Never! I'm too stubborn for that. I was determined to learn how to do this, one way or another!

Thank goodness for the internet! I went online in search of a tutorial on sewing curves together, hopefully with a helpful video, to give me advice or instruction on how to proceed.

One of the most helpful sites I found was this one:

http://shecanquilt.blogspot.ca/2011/12/sewing-curves-is-not-hard-seriously.html

Clipping the curves is also essential. Here's a good video to watch if you are a "Newbie" in that area:

http://wendigratz.blogspot.ca/2011/02/tips-and-tricks-for-sewing-curves.html

It isn't very hard to sew curved pieces together, once you know how, but it IS very slow and time-consuming.  Tweezers are very helpful in this task.


Decrease your stitch length before you start. Then put the 2 pieces rights sides together and pin where you want to start sewing.


Match the edges little by little

Sew 2 or 3 stitches, then move the edge of the top piece to match the edge of the bottom piece, little by little, sewing 3 or 4 stitches slowly as you go. Try to keep your seams exactly 1/4 inch.  Use your tweezers to help you grab the edges as you get close to the end.


Keep sewing, a few stitches at a time, stopping to pull the edges together as you go

Almost done! Your tweezers will be your best tool at this point


Once you are done sewing them together, clip all the curves carefully about every 1/4 inch along the seams, being careful not to cut into the stitches. Then press well.


It may have looked impossible, but you did it! :)


 If the edges haven't matched up well when you're done sewing, don't be afraid to use your seam ripper and take out part or even all of what you have sewn. There is a learning curve to this,  (No pun intended!  :)  and you will get better.


I do encourage you to view the short video mentioned above (especially the first one) if you are new to sewing curves and be careful when you clip the edges! I ruined a few pieces by accidently cutting into them, which means extra time and work to remove the ruined piece, make a new one and then sew it back on...

All part of the joy of sewing! :)


Labels: